Let’s walk through the setup of how to ingest data from an AWS S3 bucket into Salesforce Data Cloud. This is a continuation of a previous post where we set up a AWS S3 bucket: https://howtodatacloud.com/2024/07/25/how-to-set-up-an-aws-s3-bucket-for-data-cloud-ingestion/
This walkthrough will cover the following steps:
1.) Navigating in Data Cloud to S3 setup
2.) Create a new S3 Bucket connection in Data Cloud
3.) Create a basic Data Stream and ingest the S3 bucket data
4.) Validate data ingested into Data Cloud
Step I: Navigating in Data Cloud to S3 setup

(1) In Data Cloud Setup.
(2) Navigate to the Data Cloud folder.
(3) Click on the Connectors item.
(4) View all existing Connectors.
Step II: Create a new S3 Bucket connection in Data Cloud

(1) In the Connector screen click the “New” button.
(2) Select Amazon S3 and it will highlight with a blue border.
(3) Click Next.

(1) Enter the name for the Bucket. It may make sense to use the same name of the S3 bucket created in AWS.
(2) Enter in the Access Key.
(3) and the Secret Access Key provided when you set up your S3 bucket.
(4) Add in the name of the Bucket.
(5) Click on Test Connection to see if everything checks out.
(6) In this example an error pops up as the auto generated Connection API Name has an extra underscore. Let’s remove that underscore and try testing the connection again.
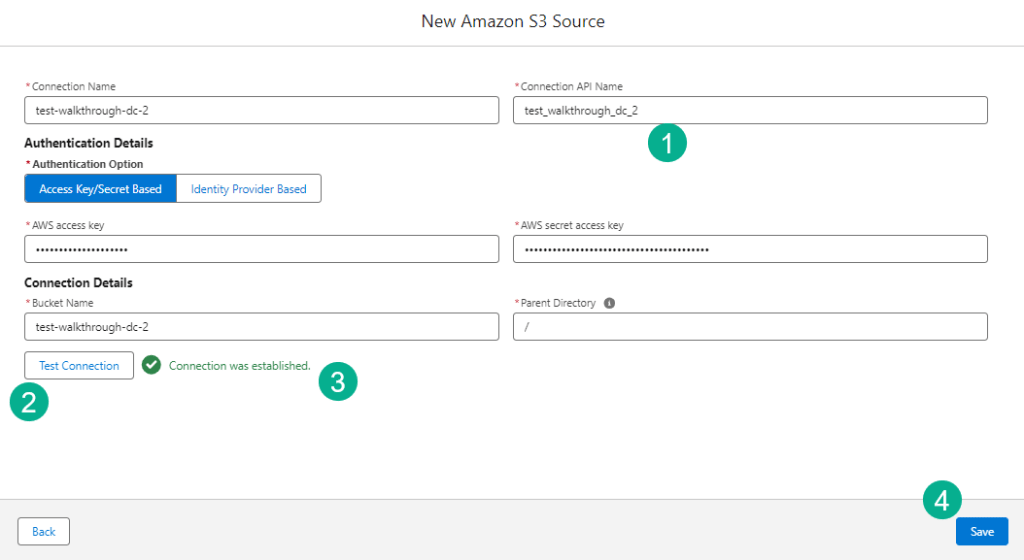
(1) Removing the underscore.
(2) Select “Test Connection”.
(3) If all is working a green message should appear.
(4) Click Save.

Once saved your Bucket connection will appear in the Connector list view in a status of “Pending” which will change to “Active” in a few seconds.
Step III: Create a basic data stream and ingest the S3 bucket data

(1) Back in the Data Cloud main menu.
(2) Select the Data Streams tab.
(3) Click on “New”.

(1) Select the Amazon S3 option.
(2) Select “Next”.

(1) Under Connection a drop down of the available S3 Buckets will appear.
(2) Select the S3 Bucket that was just created.
(3) click Next
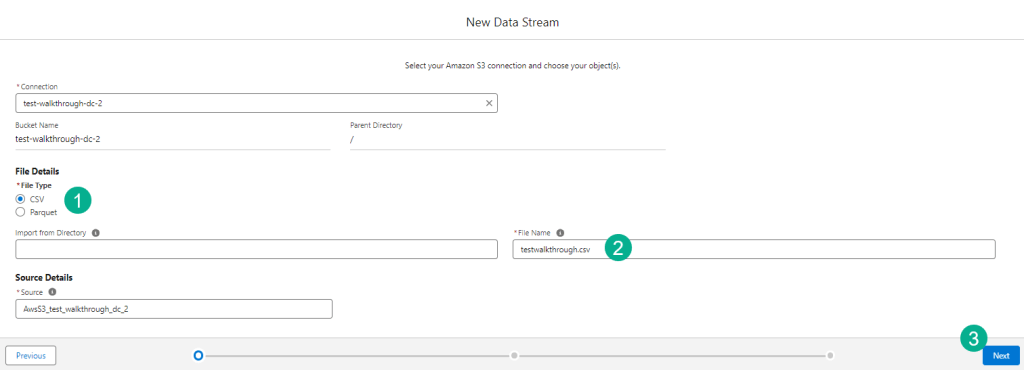
(1) Select file type, the default will be csv which will work in our use case.
(2) Enter in the name of the file that’s dropped into your S3 Bucket.
(3) Click Next.

(1) Check the Data Lake Object API Name to make sure it doesn’t have the underscore.
(2) Be mindful of which category to select here, for our use case we are selecting “Profile”.
(3) Select the Primary Key. In a future blog we’ll go into more detail on how to set up a Data Stream to align with Identity Resolution and create a custom primary key.
(4) Click Next.

(1) Select the refresh mode, either Upsert or Full Refresh. It all depends on your data model. If you are cleaning and optimizing data in AWS then the Full Refresh might make sense. For our use case today we’ll select Upsert.
(2) Select the Schedule option to determine how often the data is refreshed and then click the “Deploy” button not pictured here.
Step IV: Validate data ingested into Data Cloud

(1) Once deployed the Data Stream will be created.
(2) Validate all the fields in your S3 csv are present.
(3) You can start modeling your data to create a DMO which we’ll cover in an upcoming blog.

(1) To validate the data click on the Data Explorer tab.
(2) Select Data Lake Object.
(3) Navigate to the file name from the csv.
(4) Validate the data in the csv file now in Data Cloud.
We hope this was a helpful walkthrough of how to ingest data from an S3 Bucket into Data Cloud. Please let us know if you have a different approach to ingesting data from an S3 bucket into Data Cloud.

Leave a comment